1.安装
下载地址:seata
本文采用 1.6.1 版本,在历史版本中下载下来是 zip 包,直接在 windows 上解压后直接上传到服务器
# 上传至服务器 /home 目录下

cd /home

# 1.6.1 解压后就是 seata 文件夹,移动到统一管理路径下
mv seata /opt/
2.配置
seata有三种存储模式:file、db、redis,如果是单节点,并且存储模式采用file,那么直接解压启动即可;存储模式采用redis,则需要seata-server 1.3版本及以上。
这里选用 db 数据库方式。
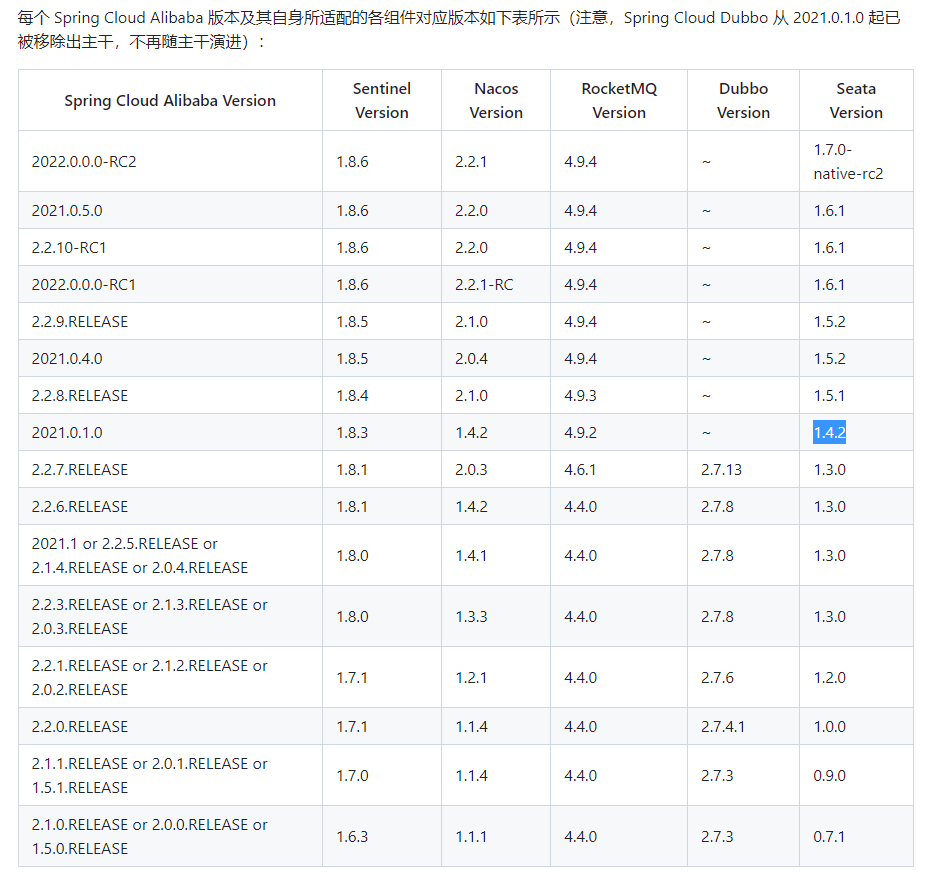
一定要注意:还有 spring cloud alibaba、sentinel、naocs 组件都有对应版本,可参考:版本说明
1.修改配置文件 application.yml
#  Copyright 1999-2019 Seata.io Group.
#
#  Licensed under the Apache License, Version 2.0 (the "License");
#  you may not use this file except in compliance with the License.
#  You may obtain a copy of the License at
#
#  http://www.apache.org/licenses/LICENSE-2.0
#
#  Unless required by applicable law or agreed to in writing, software
#  distributed under the License is distributed on an "AS IS" BASIS,
#  WITHOUT WARRANTIES OR CONDITIONS OF ANY KIND, either express or implied.
#  See the License for the specific language governing permissions and
#  limitations under the License.

server:
  port: 7091

spring:
  application:
    name: seata-server

logging:
  config: classpath:logback-spring.xml
  file:
    path: ${user.home}/logs/seata
  extend:
    logstash-appender:
      destination: 127.0.0.1:4560
    kafka-appender:
      bootstrap-servers: 127.0.0.1:9092
      topic: logback_to_logstash

console:
  user:
    username: seata
    password: seata

seata:
  config:
    # support: nacos, consul, apollo, zk, etcd3
    type: nacos
    nacos:
      server-addr: 127.0.0.1:8848
      namespace: 614af21f-c9e8-4c6d-b696-871ce137f28a
      group: SEATA_GROUP
      username: nacos
      password: nacos
      context-path:
      ##if use MSE Nacos with auth, mutex with username/password attribute
      #access-key:
      #secret-key:
      data-id: seataServer.properties
  registry:
    # support: nacos, eureka, redis, zk, consul, etcd3, sofa
    type: nacos
    nacos:
      application: seata-server
      server-addr: 127.0.0.1:8848
      group: SEATA_GROUP
      namespace: 614af21f-c9e8-4c6d-b696-871ce137f28a
      cluster: default
      username: nacos
      password: nacos
      context-path:
      ##if use MSE Nacos with auth, mutex with username/password attribute
      #access-key:
      #secret-key:
  store:
    # support: file 、 db 、 redis
    mode: db
    db:
      datasource: druid
      db-type: mysql
      driver-class-name: com.mysql.jdbc.Driver
      url: jdbc:mysql://127.0.0.1:3306/seata?rewriteBatchedStatements=true
      user: root
      password: 123456
      min-conn: 10
      max-conn: 100
      global-table: global_table
      branch-table: branch_table
      lock-table: lock_table
      distributed-lock-table: distributed_lock
      query-limit: 1000
      max-wait: 5000
#  server:
#    service-port: 8091 #If not configured, the default is '${server.port} + 1000'
  security:
    secretKey: SeataSecretKey0c382ef121d778043159209298fd40bf3850a017
    tokenValidityInMilliseconds: 1800000
    ignore:
      urls: /,/**/*.css,/**/*.js,/**/*.html,/**/*.map,/**/*.svg,/**/*.png,/**/*.ico,/console-fe/public/**,/api/v1/auth/login
3.初始化数据库
4.手动启动
nohup sh /opt/seata/bin/seata-server.sh -p 8091 -h 127.0.0.1 -m db &

# 参数解释
-p 8091 # 设置监听端口为 8091(可选),默认:8091
-h 127.0.0.1 # 设置主机地址,在注册中心或配置中心中,这个 IP 地址会被用于服务注册(可选)
-m db # 指定 Seata Server 的存储模式(mode)为 db 数据库模式(可选)
5.开机启动
1.进入init.d目录
cd /etc/init.d2.创建服务文件
vim seata3.编写脚本
#!/bin/bash
#chkconfig: 2345 63 37
#description: seata service
#processname: seata-1.4.2
export SEATA_HOME=/opt/seata
case $1 in
		start)
			nohup sh $SEATA_HOME/bin/seata-server.sh > /dev/null 2>&1 &
			echo "seata is started"
			;;
		stop)
			pkill -f seata-server
			echo "seata is stopped"
			;;
		restart)
			pkill -f seata-server
			echo "seata is stopped"
			sleep 1
			nohup sh $SEATA_HOME/bin/seata-server.sh > /dev/null 2>&1 &
			echo "seata is started"
			;;
		*)
		echo "start|stop|restart"
		;;
esac
exit 0
4.修改文件权限
chmod 777 seata5.添加或删除服务
添加:
chkconfig --add seata删除:
chkconfig --del seata6.启动、停止或重启服务
启动:
service seata start停止:
service seata stop重启:
service seata restart7.设置开启或关闭开机启动
开启:
chkconfig seata on关闭:
chkconfig seata off8.查看es进程,验证是否已启动
http://192.168.67.10:7091/,账号和密码均在 application.yml 里配置了,默认 seata
ps -ef | grep seata